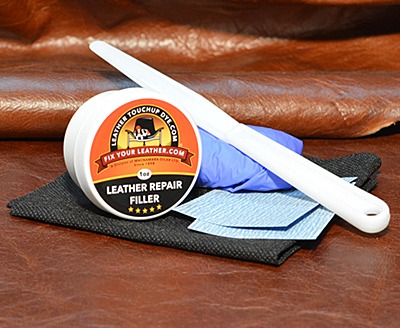
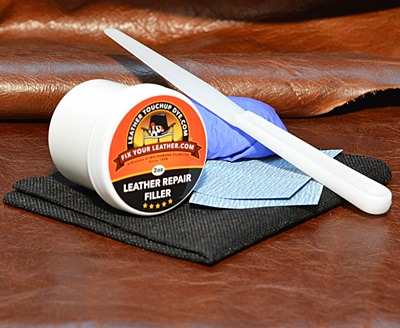
Watch and Subscribe to our YouTube channel!
Limited Time!
USA / Canada* Shipping ONLY $14.95 USD!

Celebrating 125 years!

Leather Repair Kits – that Actually Work!

We Ship WorldWide

Leather Repair Filler – Small 1oz

SALE PRICE: USD $39.95

Includes: 1x Small 1oz Leather Repair Filler, 1x 9″ x 10″ Leather Repair Cloth, 2x Ultra Grit Sandpaper, 1x Nylon Palette Knife, 2x Rubber Gloves, Instructions

SKU: LTUD-LRFK1 Category:

Description

To repair deep scratches, small or medium rips, and holes. When fully dry, apply our leather dyes and sealer over top of the repaired area.

  • 1x Small 1oz Leather Repair Filler
  • Instructions

FREE Kit included!

  • 1x 9″ x 10″ Leather Repair Cloth
  • 2x Ultra Grit Sandpaper
  • 1x Nylon Palette Knife
  • 2x Rubber Gloves

Additional information

Weight 0.076 kg

Leather Repair Filler Instructions

Our leather filler is premium quality, professional grade.

  1. Clean surface of area with our leather cleaner that requires repair – let dry. (you can use hair dryer to speed drying time )
  2. If there is a tear right through the leather cut a piece of leather repair cloth 50% bigger than the rip. Center the cloth under the rip and make sure it is laying flat. The palette knife will aid you in positioning the cloth.
  3. Apply leather filler to inside the whole perimeter of the rip and then glue tear down to the repair cloth – try to leave a concave void ( or valley ) in the torn area that will be later filled in. Let area dry 4-6 hours or overnight before applying the next coat.
  4. Now apply filler to ripped area and fill in the concave void ( or valley ) with the leather repair filler making the repair level with the surface. ( you can clean or wipe areas up with warm water if the filler has not dried. Let dry overnight.  ( drying time is approx. 4-6 hours per mm of leather repair filler ) – to speed drying time up you can use a hair dryer, * but is never a good idea to rush repairs.
  5. If there is just a deep scratch or damage- apply small amount of filler level off and let dry over night.
  6. Once the leather repaired filler has cured sand area to make smooth with supplied ultra  grit sandpaper. You are now ready to apply the leather dyes over top of repair.

For further instructions and tips, please visit our YouTube channel : www.youtube.com/user/Leathertouchupdye

You can also visit our FAQs page where you’ll find answers to many common questions here: www.leathertouchupdye.com/how-to-fix-leather-furniture-faqs

If you have concerns or questions about your recently received order, please visit our Concerns – Troubleshooting page here: www.leathertouchupdye.com/concerns